

This tutorial uses nothing but the built in Photoshop filters and also some outside filters
This is also my own idea, so if it looks like someone else, then it is not my intention
I will try to explain on how I do each step to the best of my ability
This tutorial acts like a guide and the finish result is yours for personal use
I have used Photoshop CS5, though if you know your way round then this will work in all versions
This tutorial was written on Saturday 20th July 2020
•♥•♥•♥•♥•♥•♥•♥•♥•♥•♥•♥•♥•♥•♥•♥•♥•♥•♥•
SUPPLIES:
Tube of choice
I have used a free one from Juri Ueda
I have used Soulmate for the main font and Tahoma for the copyright
Any font of that type is up to you
OUTSIDE FILTERS:
VM Toolbox - Tiler
dbs flux - Bubbles
DROP SHADOW TUBE:
Blend Mode: Multiply
Opacity: 30%
Angle: -45
Distance & Size: 5px
Spread: 0
DROP SHADOW TUBE BORDER & FRAME:
Blend Mode: Multiply
Opacity: 75%
Angle: Doesn't matter
Distance & Spread: 0px
Size: 10px
•♥•♥•♥•♥•♥•♥•♥•♥•♥•♥•♥•♥•♥•♥•♥•♥•♥•♥•
SIGNATURE:
Open a new document of 750x250px
We are first going to create our template
Open another new document though this time 180x180px
Create a new layer and with your Paint Bucket Tool fill that with any colour of your choice
Doesn't matter what as this will be recoloured at a later point
Double click on the Layer 1 layer and find Stroke
Use the image below for the settings

Create a new layer, move that down one, right click on the top layer and Merge Down
With your Magic Wand Tool and at the top uncheck the Anti-alias
Click in the middle of the frame and press delete on the keyboard
Select all and copy and paste that to your signature background
Press Ctrl&T (Free Transform) and at the top move the angle to -7.50
Below is what I mean and mine has been cropped from the original size
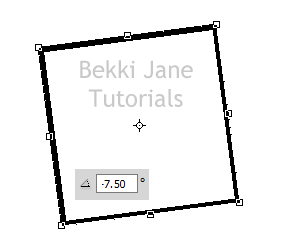
If the corners looked jagged then don't worry, click the tick and it will be fine
To keep it centre select the move tool and with the arrow buttons, move to the left and away from the edge slightly

Open a new image this time 750x120px and do the same as you did for the square
Copy and paste that as a new layer and move down one
With your Rectangular Marquee Tool remove both ends
Move that layer down one

It doesn't matter if you see the lines at the bottom as that will be covered up
Hide the two layers that you have created and click on the bottom layer
Open your tube and copy and paste that as a new layer
Move that to the left, duplicate (Ctrl&J), move to the right a bit and move down
Do this for all the layers and it should be something like below
or depending on the tube that you have used
I then from the top of the tube layer, merge down one by one and move slightly
Duplicate this layer a few times and click on the layer above the Background layer hiding the layers above
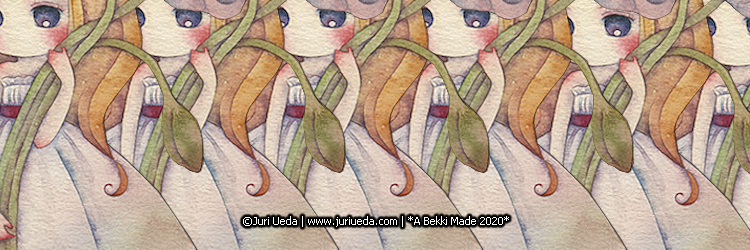
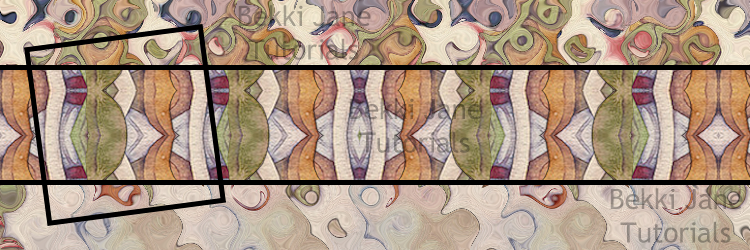
In Filter find VM Toolbox - Tiler filter, if you have Filters Unlimited, then it could be in there
Mine was in there automatically when I added the filter to my PS filter folder
Below is my settings of the filter which is the default settings

Please click on the thumbnail for the full size
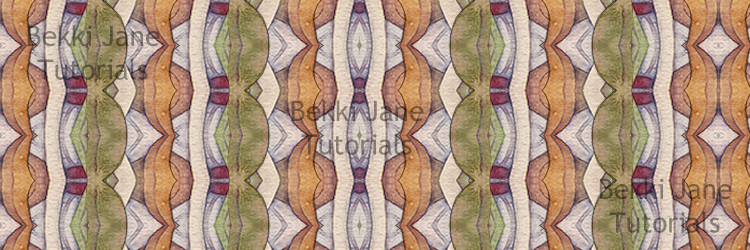
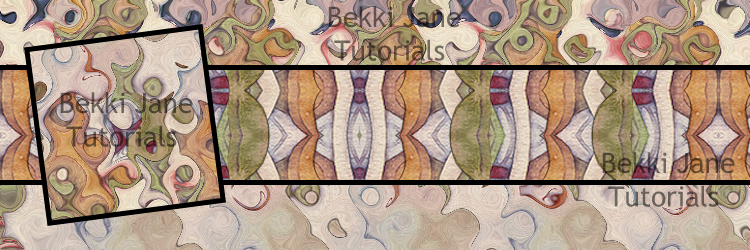
Click and unhide the layer above, go to Filter >> dbs flux >> Bubbles and use the settings below

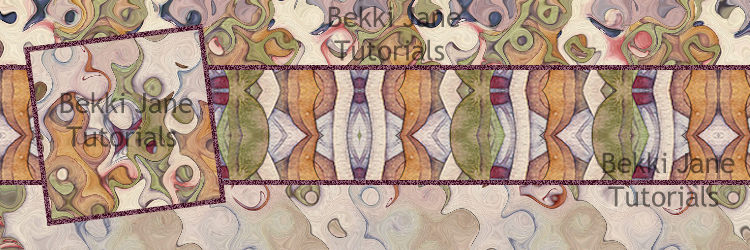
Unhide the top two layers and delete the rest so that you have 4 layers on your layer palette
Move the bubbles layer to the bottom, click on your stipe layer and grab your Magic Wand Tool
Click inside it, Select >> Modify >> Expand, in the box type 2 and click OK
Click back on the tiler layer and Select >> Inverse, delete and deselect
Move the small stripes to above the thick srtipe
Now with the bubbles layer, duplicate that and move to above the strip layer
Edit >> Transform >> Flip Vertical and move to where you what
Ctrl&T (Free Transform) and in the angle box type in -7.50 and click the tick button
Do the same with the stripe layer
Now we need to change the colours of our "borders", "frames" whatever.
Click on the stripe border layer and choose a darkish colour from either your tube or one of your backgrounds
On the layers palette, holding the Ctrl button click inside the layer, not the text name, but the one next to it and you will see "marching ants" around them
Delete the layer by using the "bin" below and next to that to the left create a new layer
With the Paint Bucket Tool flood fill that in with your chosen colour
Do the same for the frame layer

This is optional: Go to Filter >> Noise >> Add Noise, type in the box a number of 25 or below and click OK
Go back to your tube layer and the one that I have used had a swirl to the left side, I took that off along as I don't need it
Copy and paste that as a new layer to above the stripe layers and to resize press Ctrl&T (Free Transform), holding down Shift, click on one of the corners resize slightly and click the tick
I also applyed the drop shadow that I have set above by double clicking on the the tube layer and selecting drop shadow
Click on the below layer, create a new layer, right click on the tube layer and Merge Down

Click on background layer of the frame and copy and paste the tube again
Edit >> Transform >> Flip Horizontal and with the free transform moved the angle again to -7.50
I done the same as I did to the "borders" and set the layer mode to Luminosity and the Opacity to 90%
Right click on the "stripe" layer and merge down and apply the drop shadow as I have mentioned above
Create a new layer, move down if nessercery, right click and on the layer above and Merge down
With the frame, hide all the other layers apart from the "frame", the Luminosity layer and the small bubble layer and right click on any of the 3 visable layers and Merge Visable
Un hide all of the other layers and apply the same drop shadow as the "stripe"
This is optional, I went back to the tube and extracted the flower from the main tube
Copied and paste that to above the "frame" and moved the angle to -30.00 along wth resizing differently and applyed a drop shadow
For the border I have done the exact same as I have done at the beginning and applied the same drop shadow
I have done this twice, first with a light colour and the stoke of 5 same again and this time with the stroke of 3
Also on the darker coloured border added the same noise, merge the two layers apply the same drop shadow and duplicate, and all the layers together
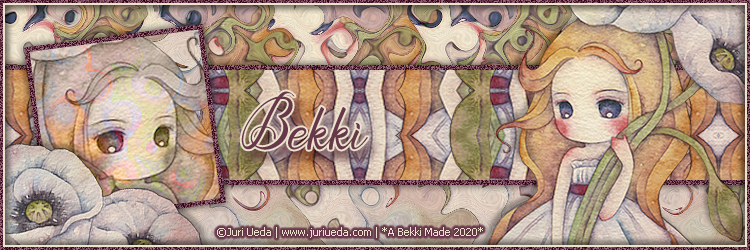
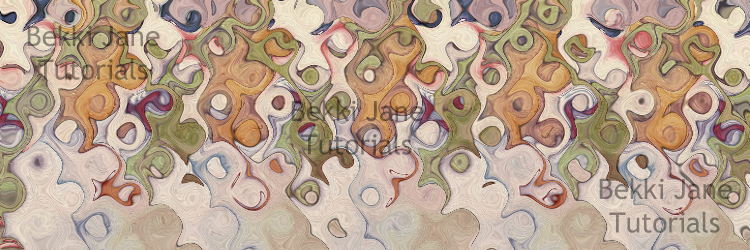
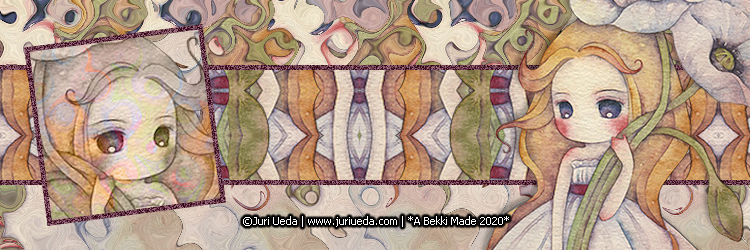
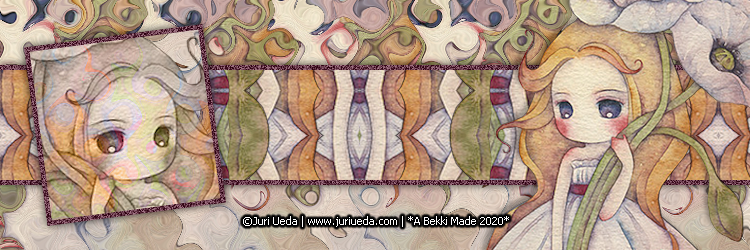
Look at my final signature at the top of the tutorial to see what I mean
Add the correct copyright, your name and save as PNG
•♥•♥•♥•♥•♥•♥•♥•♥•♥•♥•♥•♥•♥•♥•♥•♥•♥•♥•
AVATAR
What I did here was I made a new document of 180x180px
Then did another document of 100x100px and done the same as I have done in the "frame" layer though this time I have done a stroke of 3
Used the same backgrounds as the signature and the same border
Look at the top of the page to see what I mean

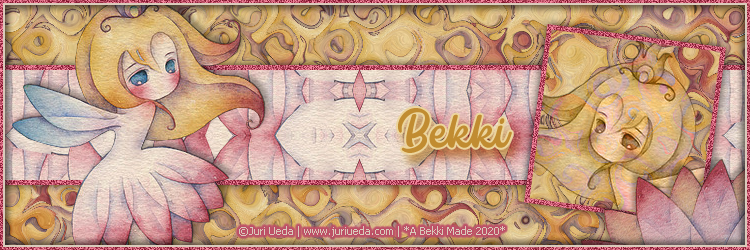
Above is a and example using the same artist, and I have "mirrored" but everything is the same as the tutorial