This tutorial was written for those with knowledge of Photoshop
If you don't have Photoshop then this can easily be converted
for Paint Shop Pro or GIMP
•♥•♥•♥•♥•♥•♥•♥•♥•♥•♥•♥•♥•♥•♥•♥•♥•♥•♥•
SUPPLIES:
FTU kit called Pink Darkness from Sylly Creationz HERE
Tube of choice
I have used a FTU one called Sulev_Daekazu_Miss_Rebell_Heart_Nick_Tube0216
You can view more of his artwork HERE
Mask used DD_NVM_3.jpg from Dees'Sign Depot HERE
Font used Sunrise Place for the main and GelPen, Tahoma or Arial for copyright HERE
OTHER INFORMATION:
These are the settings that I usually use if your using a drop shadow
Blend Mode: Normal or Multiply
Opacity: 75 or 100%
Angle: 120
Distance & Spread: 0px
Size: 10px
OUTSIDE FILTERS:
MuRa Meister Copies filter
•♥•♥•♥•♥•♥•♥•♥•♥•♥•♥•♥•♥•♥•♥•♥•♥•♥•♥•
Open a new document of 800x800px
SC_PinkDarkness_frame02.png and resize to your liking
Copy and paste that as a new layer on your canvas
Open SC_PinkDarkness_flower019.png and resize
Copy and paste that as a new layer, move below the frame and go to
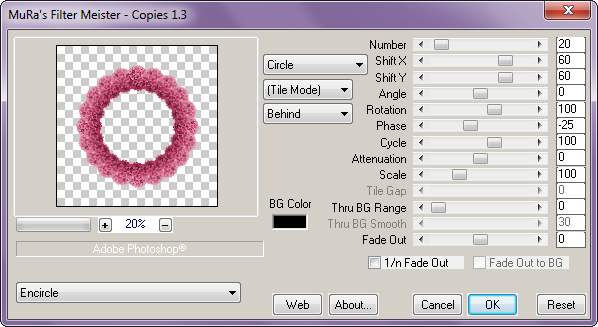
Filter >> MuRa Meister >> Copies and use the settings from the image below:

Click on the top layer, grab your Magic Wand Tool and click in the middle of the frame
Go to Select >> Modify >> Expand >> Expand Selection, type in anything that
you want in the box and clik OK
Click on the bottom layer and hit Delete on your keyboard
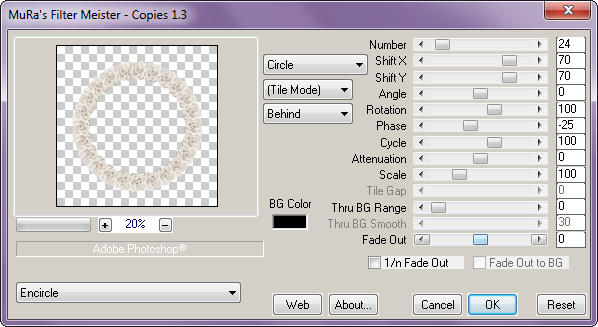
Open SC_PinkDarkness_flower06.png, and use the settings in the above step
When you open copies again use the from below:

Open SC_PinkDarkness_paper04.png, resize if you wish
Copy and paste as a new layer and move that below all layers
Use the same Magic Wand settings as above
Open your tube of choice and remove the copyright
Resize if you wish and copy and paste that below all layers
Edit >> Transform >> Flip Horizontal and move that slightly to the right
Grab your Polygonal Lasso Tool and get rid of any unwanted tube from the top and bottom
Change the layer mode to Luminosity and the Opacity to 70%
Back to your tube, undo your resize and resize again to your liking
Copy and paste as a new layer and move to where is suits you
With your Rectangular Selecton Tool, select about halfway, click on the top layer and paste
Move in position so that the top and bottom line up exactaly
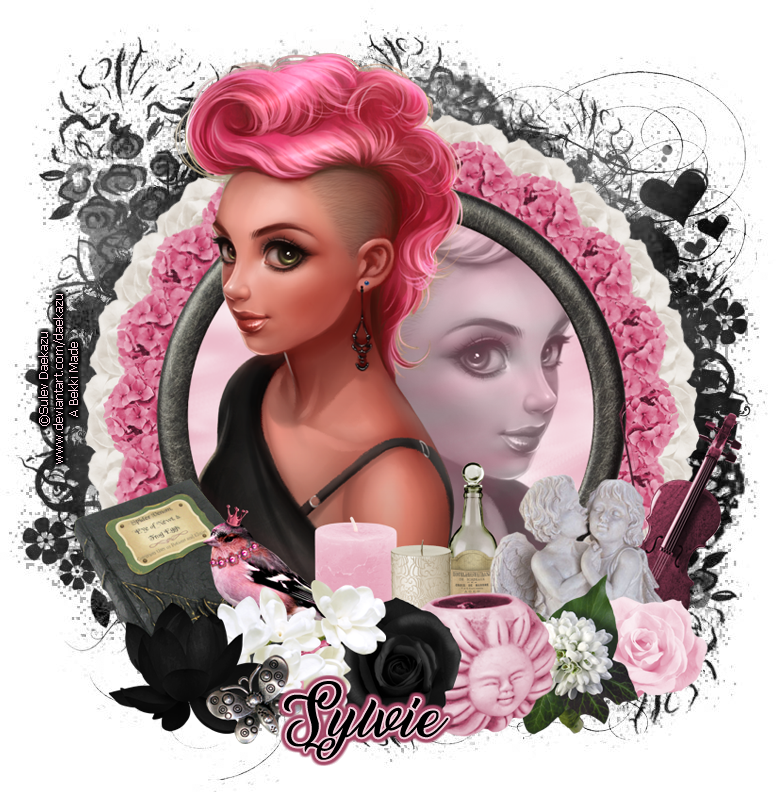
Check my final tag for the position
Open SC_PinkDarkness_spellbook.png and resize
Copy and past that as a new layer and position
Check my final tag for the position
Below is the order of the other elements that I've used
Up to you on the size and check my tag for the position
If any of the elements are mirrored the go to Edit >> Transform >> Flip Horizontal
SC_PinkDarkness_flower02
SC_PinkDarkness_flower012
SC_PinkDarkness_bird
SC_PinkDarkness_flower03
SC_PinkDarkness_vase
SC_PinkDarkness_candle01
SC_PinkDarkness_candle02
SC_PinkDarkness_angels
SC_PinkDarkness_flower013
SC_PinkDarkness_flower018
SC_PinkDarkness_violin
SC_PinkDarkness_bottle
SC_PinkDarkness_butterfly
Merge visible all of the layers, open the paper that you want to
use and the mask that you want to use
First copy and paste the paper, then the mask and apply
If you want to learn how to use masks in Photoshop then
you can view my tutorial here
Finally apply your name the correct copyright and save as png
•♥•♥•♥•♥•♥•♥•♥•♥•♥•♥•♥•♥•♥•♥•♥•♥•♥•♥•
This tutorial was written by Bekki Jane Tutorials
Any resemblance to any other tutorial or tag is purely coincidental
All my tutorials act as a guide only
