This tutorial was written for those with knowledge of Photoshop
If you don't have Photoshop then this can easily be converted
for Paint Shop Pro or GIMP
•♥•♥•♥•♥•♥•♥•♥•♥•♥•♥•♥•♥•♥•♥•♥•♥•♥•♥•
SUPPLIES:
FTU kit called Bunnies and Chicks from Sylly Creationz HERE
This is a kit only tutorial
Frame template HERE
I have created this myself and you can use it away
from this tutorial, but for PERSONAL USE ONLY!
Mask used SC_sylviemask016 from Sylly Creationz HERE
Font used The Heart Maze Demo for the main and GelPen, Tahoma or Arial for copyright HERE
OTHER INFORMATION:
These are the settings that I usually use if your using a drop shadow
Blend Mode: Normal or Multiply
Opacity: 75 or 100%
Angle: 120
Distance & Spread: 0px
Size: 10px
•♥•♥•♥•♥•♥•♥•♥•♥•♥•♥•♥•♥•♥•♥•♥•♥•♥•♥•
Open the frame in your programme
Expand the canvas bigger to the overall frame
Delete the copyright layer
We will resize at the end
Click on the Circle Backround layer, in the papers folder,
open SC_BunniesandChicks_Paper01.jpg and resize
Copy and paste that as a new layer on your frame template
To get rid of the edges, point your mouse to the circle, hold Ctrl and click
Inverse the layer, delete and then deselect
Click on the Circle Fame layer and open
SC_BunniesandChicks_Paper010.jpg
Resize and copy and paste to your canvas frame
Do the same as the above frame and delete the Circle Frame layer
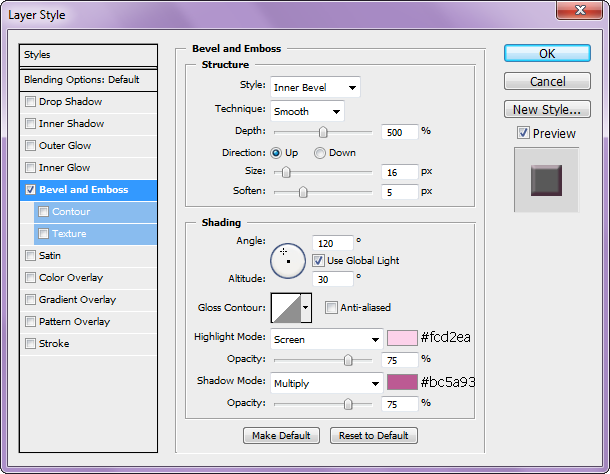
Double click on the top layer use the layer style from the image below:

The rectangle layers is basically done in the same way as circle layers
When it comes to the layer styles, then change the Highlight & Shadow
modes to colours that match your frames
To free rotate any of the rectangle background layers press Ctrl & T
Rectangle bacground and frame 2, angle is 7.5 degrees
Rectangle bacground and frame 3, angle is 15 degrees
The papers that I have used are:
SC_BunniesandChicks_Paper011.jpg (Rectangle 3 & 1 Frames)
SC_BunniesandChicks_Paper02.jpg (Rectangle 3 Backround)
SC_BunniesandChicks_Paper12. jpg (Rectangle 2 Frame)
SC_BunniesandChicks_Paper05.jpg (Rectangle 2 Background)
SC_BunniesandChicks_Paper08.jpg (Rectangle 1 Background)
Now that we have the frame decorated time to add elements
Click in the circle background layer and in the elements folder open SC_BunniesandChicks_bunny03.png
Resize, copy and paste and position
With your Rectangular Marquee Tool, select about half way down,
cut, click on the top layer, and paste
Position so that they line up exactly to the bottom part
Open SC_BunniesandChicks_bunny02.png and resize
Copy and past that as a new layer and position
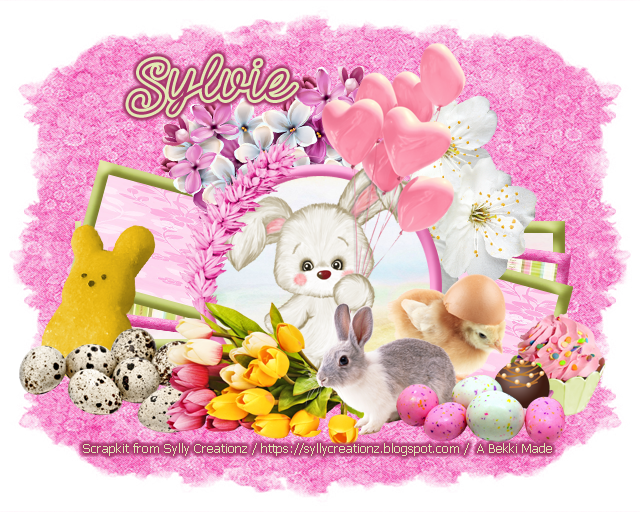
Check my final tag for the position
Below is the order of the other elements that I've used
Up to you on the size and check my tag for the position
If any of the elements are mirrored the go to Edit >> Transform >> Flip Horizontal
SC_BunniesandChicks_chick
SC_BunniesandChicks_eggs01
SC_BunniesandChicks_candy
SC_BunniesandChicks_flowerbunch011
SC_BunniesandChicks_flowerbunch06
SC_BunniesandChicks_flowerbunch03
SC_BunniesandChicks_cupcake02
SC_BunniesandChicks_fern
SC_BunniesandChicks_eggs05
SC_BunniesandChicks_peep02
Merge visible all of the layers, open the paper that you want to
use and the mask that you want to use
First copy and paste the paper, then the mask and apply
If you want to learn how to use masks in Photoshop then
you can view my tutorial here
Finally apply your name the correct copyright and save as png
•♥•♥•♥•♥•♥•♥•♥•♥•♥•♥•♥•♥•♥•♥•♥•♥•♥•♥•
This tutorial was written by Bekki Jane Tutorials
Any resemblance to any other tutorial or tag is purely coincidental
All my tutorials act as a guide only
