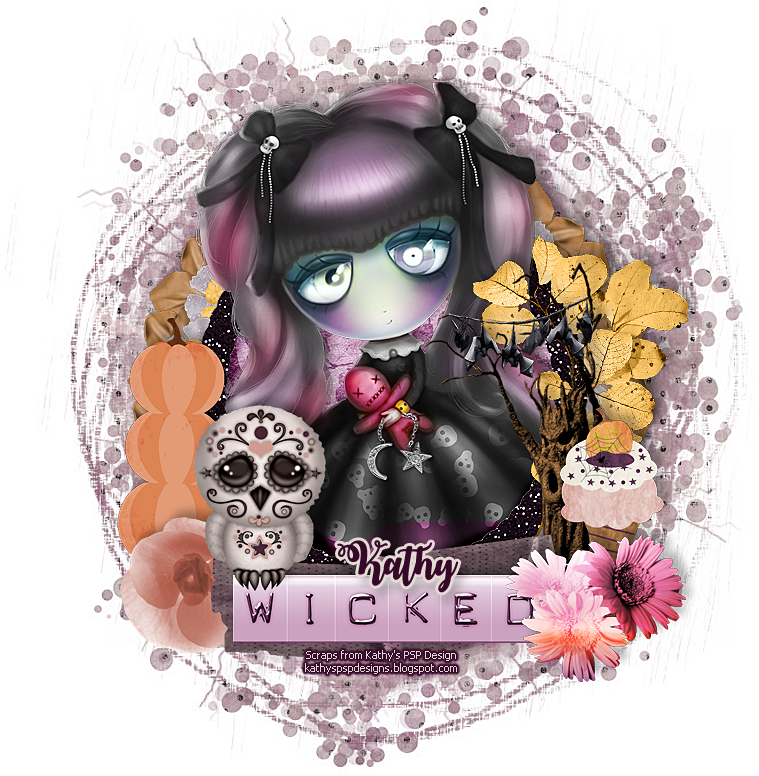
This tutorial was written for those with knowledge of Photoshop
If you don't have Photoshop then this can easily be converted
for Paint Shop Pro or GIMP
•♥•♥•♥•♥•♥•♥•♥•♥•♥•♥•♥•♥•♥•♥•♥•♥•♥•♥•
SUPPLIES:
FTU kit called KG TL Wicked Night Blog Train from Kathy's PSP Design HERE
KG2019HalloweenMasks from the same designer and they are in the post
I have used kghalloweenmask1
Font used October Twilight for the main and GelPen, Tahoma or Arial for copyright HERE
TUTORIAL DROP SHADOW SETTINGS (IF USING):
These are the settings that I sometimes use if your using a drop shadow
Blend Mode: Multiply
Opacity: 75%
Angle: -135
Distance & Size: 10px
Spread: 0px
OUTSIDE FILTERS:
MuRa Meister Copies filter
•♥•♥•♥•♥•♥•♥•♥•♥•♥•♥•♥•♥•♥•♥•♥•♥•♥•♥•
Open kgwickednight23.png, resize to your liking, copy and paste below your frame
Select all and copy and paste that to your blank canvas
Open kgwickednight40.png and resize to your liking
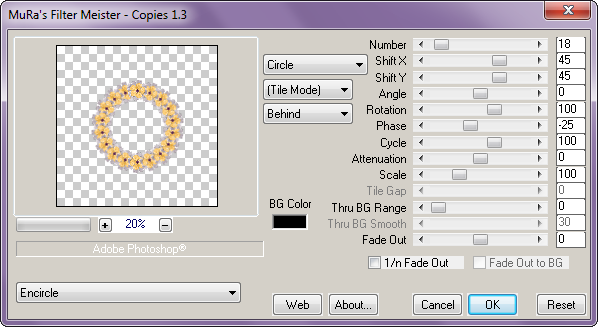
Now go to Filter >> MuRa's Meister >> Copies and use the settings below:

Open kgwickednight26.png, resize to your liking, copy and paste below your flower circle
Using the same filter as above, this time change the Shift X & Shift Y to 50
Leave all other settings alone
Right click on "Layer 2" and select Merge Down
With your Magic Wand Tool, click on the top layer and Go to Select >> Modify >> Expand
In the window that opens up, type in a suitable number and click OK
Click on the layer below and press Delete on your keyboard
This will remove the unwanted flowers form inside of your frame
Open kgwickednight13.jpg and resize to your liking
Copy and paste that to below your flower layer
If you see any of the paper showing through then use the settings above
Open kgwickednight31.png and resize to your suiting
Copy and paste that as a new layer, above your paper layer
Use a Drop Shadow (my settings is above), create a new layer,
right click on the above layer and Merge Down
With your Polygonal Lasso Tool and with the Anti-alias off
select from where you think is suitable round the head and to the other side
Edit >> Cut, click on the top layer and Edit >> Paste
With your move tool, move that back in place
I find that using the arrow keys help also
Click back on the bottom part of the element, using the same tool,
remove the bottom with the Delete button
Open kgwickednight24.png and resize
Copy and past that as a new layer and position
Check my final tag for the position
Below is the order of the other elements that I've used
Up to you on the size and check my tag for the position
If any of the elements are mirrored the go to Edit >> Transform >> Flip Horizontal
kgwickednight28
kgwickednight11
kgwickednight30
(CTRL & T IN THE ANGLE BOX ABOVE TYPE IN -75)
kgwickednight22
kgwickednight10
kgwickednight24
kgwickednight25
Merge visible all of the layers, open the paper that you want to
use and the mask that you want to use
First copy and paste the paper, then the mask and apply
If you want to learn how to use masks in Photoshop then
you can view my tutorial here
Finally apply your name the correct copyright and save as png
•♥•♥•♥•♥•♥•♥•♥•♥•♥•♥•♥•♥•♥•♥•♥•♥•♥•♥•
This tutorial was written by Bekki Jane Tutorials
Any resemblance to any other tutorial or tag is purely coincidental
All my tutorials act as a guide only
